Saturday, January 7, 2012

Kraft Explosion Memory Box

Hello Friends -


I am so excited because I finally finished a great Christmas present.  We don't always finish presents on time or we order the present but it doesn't arrive on time.  Anyway, it isn't uncommon for us to have boxes with little slips of paper or tell people that they need to give the present back so it can be finished.  This year I received one empty box and gave two.  Are we the only ones that do this?  My brother's girlfriend thinks we are crazy.  What about in your family?

Part of the reason I gave presents which weren't completed was because I decided I would rather be present for the Christmas celebrations than locked in my room completing presents.  I knew people would understand and I really wanted to sit and have our traditional glass of champagne on Christmas Eve and so on.


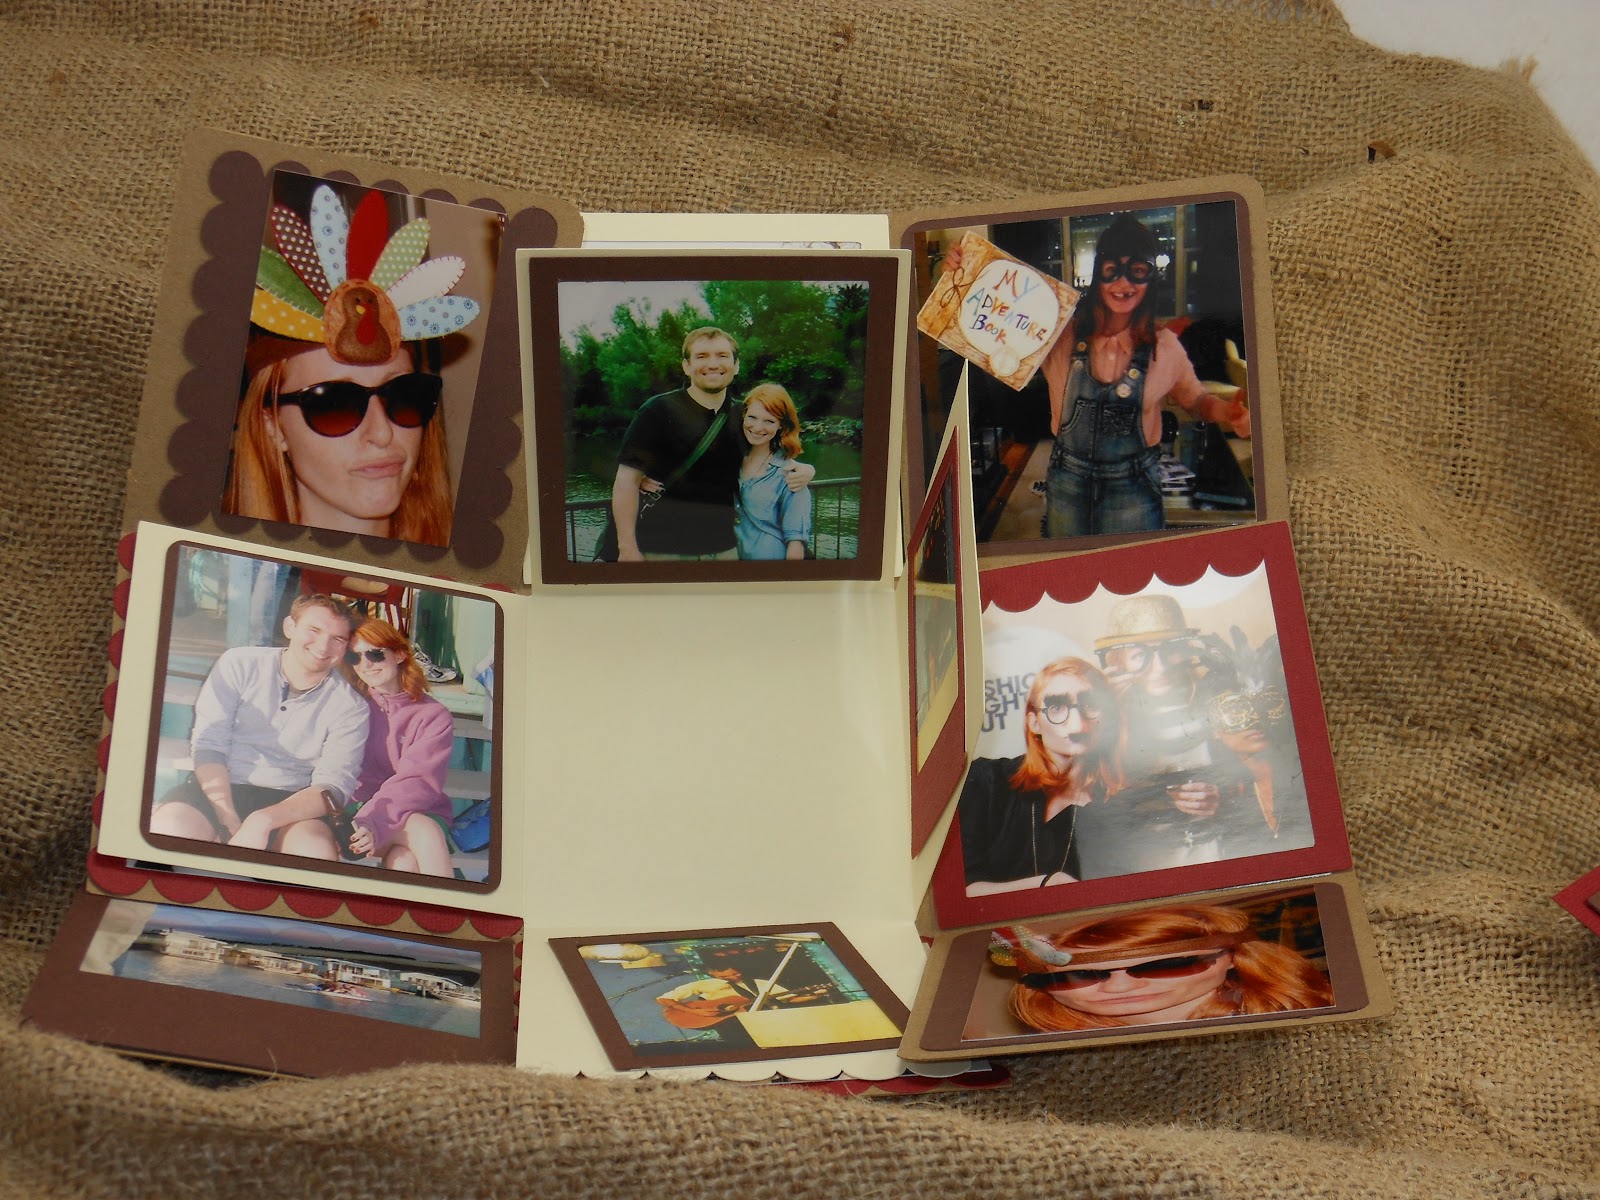
Anyway, back to the box. This is a picture of some of the pages. It doesn't have the final layer yet.  Doesn't it look very fun?  I absolutely love this project and the color palette.

Another shot of the inside with the top layer attached.


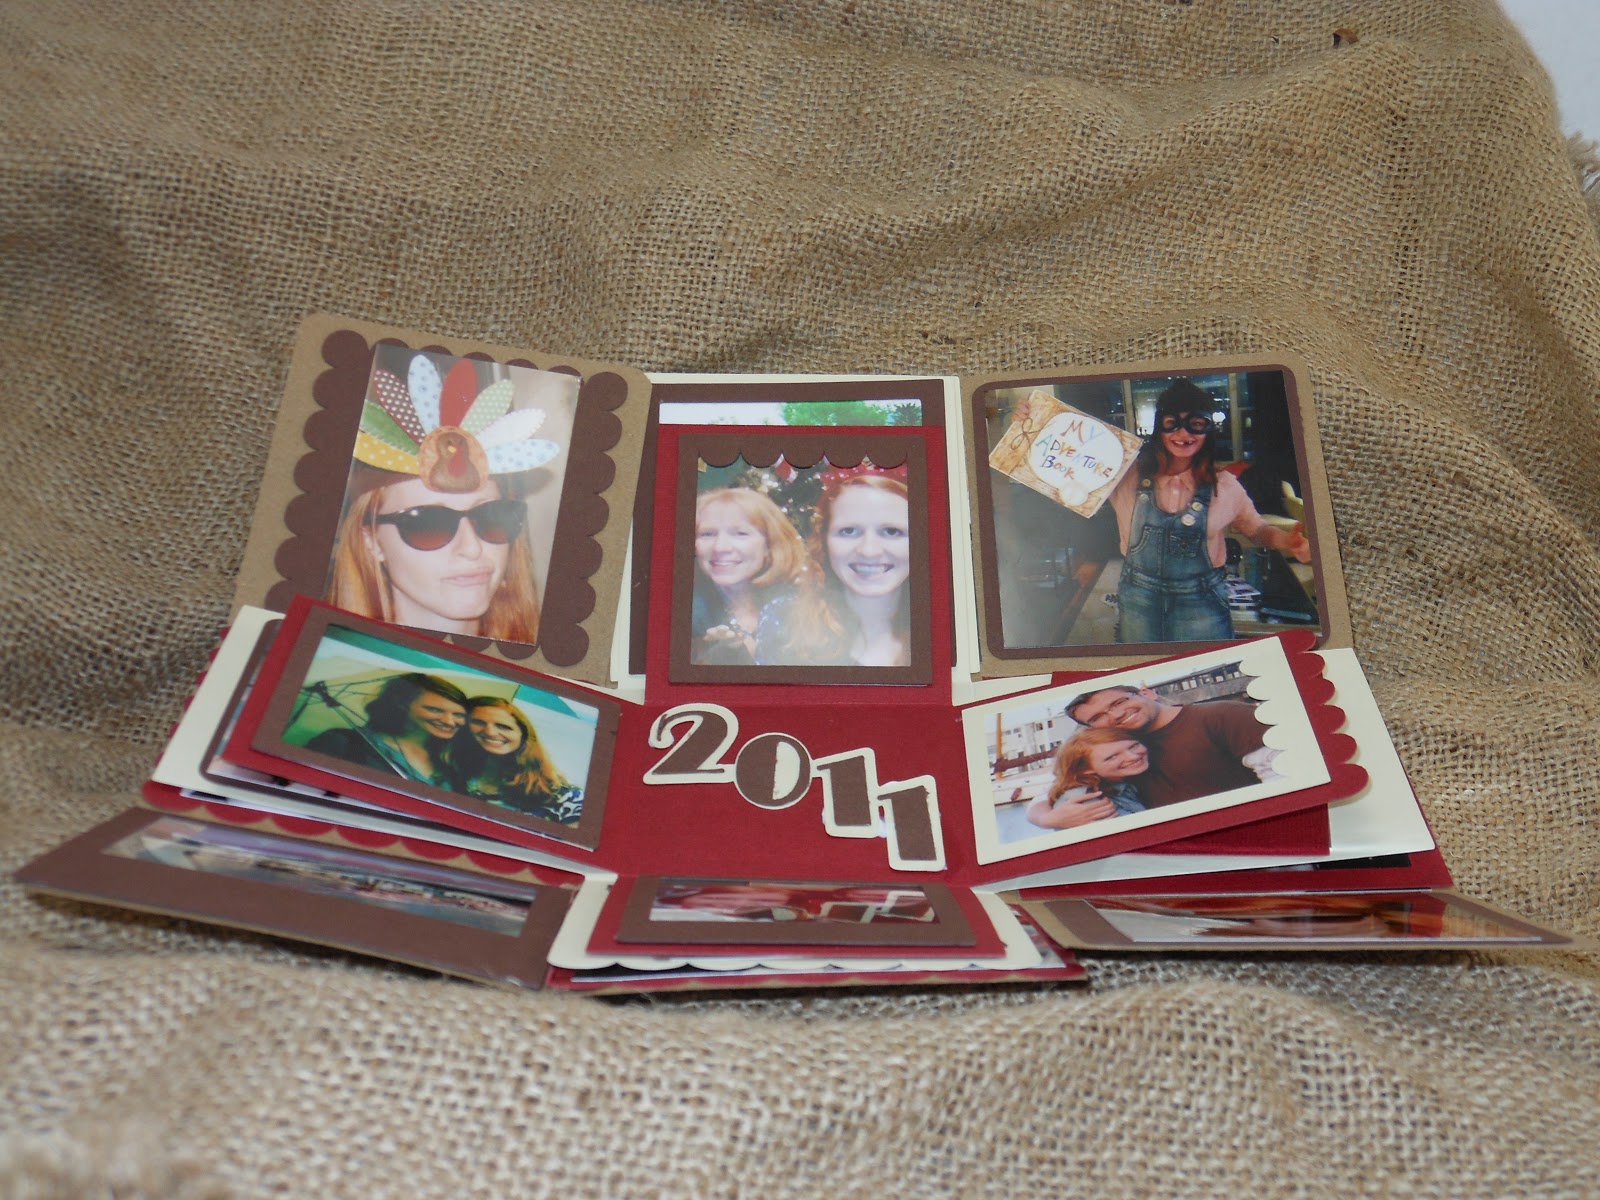
As you can see, I repeated the 2011 from the lid on the inside.  I'm thinking this might make it possible to do a series of these boxes.  I could do one for every year.  They would be fun all stacked up, don't you think.

All of the pictures were favorites from this last year (2011).


Here is the last picture.

I am entering this in the Kraft Journal Anything Goes Challenge.  You should check out some of the wonderful projects from the design team at the Kraft Journal.

Thursday, January 5, 2012

Dilly Beans Red and Black

Hello Friends -


I have a lovely little card for you today and a brand new digi company (for me) and challenge blog.  The wonderful Popsicle Toes has once again turned me onto a fantastic digi artist and a fun challenge.


As you can see, I've done an entire homage to Donna (Popsicle Toes) by fussy cutting the hat, nose, feet and the fuzzy pom pom with the hat trim.  I must say, I love the way this looks in person.

I ran the pom pom and trim through my Xyron and added flocking to give it dimension.

I hope you enjoy this little card.  I think I'll have a couple of new projects for you in the next week.

Sunday, November 13, 2011

Kraft Thank You Banner

Hello Friends -

I'm back with another fun project, a banner.


I am hosting another teacher appreciation lunch for the Wonderkid's school.  This one is much smaller, only the seven preschool teachers but I still like to dress-up the room.

Here is a close-up of the leaves in the corners of each pennant.

As you can see, all the edges have been inked.  All of the pattern paper came from a stack from Micheal's.  It is part of their partnership with DCWV.  The name of this lovely stack is Night and Fall. It has some Halloween papers and the rest are this lovely fall motif.  My only frustration, they don't sell the pack of matching solid cardstock.

The pennant and leaf cuts are all from SVGCuts.com.  I love this Serene Leaf set.  There are about a dozen different leaves which I've used over and over again.  I started out cutting the maple leaves in multiple sizes and the oak, aspen and others but then I decided it was too much.  I went back to just the oak leaves in a small size.


The baker's twine is from the Kraft Outlet and can be found here.

I'm entering this in the Kraft Journal Challenge - "thanks".  I actually started this project last week with the intention of entering it in last week's challenge -- "banners" but the week became far too busy and I couldn't pull it together.  I wanted to make something I really liked so I chose not to rush for last week.  I think it was worth the wait.  I recommend checking out some of the other incredible creations at the Kraft Journal.

This is going to be a busy week but I hope to be back to show you some more crafty projects.  I'll be making some of my Christmas cookies which can be stored in the refrigerator until I'm ready to put them in tins.  I also need to get ready for our annual trip to the Colorado mountains.  Well, I just made myself crazy thinking about all I need to do.  Back to the grindstone.

Saturday, November 12, 2011

Dear Santa T-Shirt

Hello Friends -

I'm unbelievably excited about a little project I created today.


I'm certain you are now looking at this and thinking, "Yeah, I've seen those before.  She needs to get a life."  Well, we can debate whether I need to get a life or not but...

The reason I am so excited is this is a piece of paper the Wonderkid wrote on.  I then took his actual writing and scanned it into a JPEG.  The JPEG was then traced directly into SCAL and voila:

The Wonderkid's writing on his own shirt.  Don't you absolutely love it?  I will say, it took awhile to cut so I think I might want to figure out if there is a way to even it out so it cuts ALOT faster.

I'm just so pleased with myself.  I really can't see straight.  What do you think?

Friday, November 11, 2011

Sympathy Card - Crane Mask

Hello Friends -


There are two types of cards that everyone complains about needing to make, Sympathy cards and cards for men.  Well, what about sympathy cards for men and boys?

I was asked to make four different sympathy cards which would be used for four members of the same family -- two teenagers, the daughter and wife of the gentleman that passed.

As long as I was doing one, I thought I would try to do a few of them in each style.


To make this first card I made two masks by cutting images from the Pagoda Cricut cartridge.  The crane worked very well but the bamboo was a bit more of an issue.  Because it wasn't a silhouette it wanted more detail than could be accomplished with this process.

I inked the bamboo in a couple of Distress Inks.  The crane is also Distress Ink, Black Soot.

This is such a simple way to make a card but one that I often forget.  Making the mask really couldn't be simpler.  You can use scissors, an electronic cutting machine or a die cutter.  Think of all the cool things you could make with a piece of transparency and a cutter.

What is your thought on these cards?

Thursday, November 10, 2011

Snowmen at Humbug Hall

Hello Friends -

It feels like I've been away from Humbug Hall for far too long (it just the difference between getting DT items in and squeaking in at the end of the challenge).  I almost missed the deadline but then I saw the incredible creation by Popsicle Toes.  While it reminded me I needed to get my cards photographed and all, I almost chucked them once I saw Donna's deliciousness.  Oh my, she calls it a quick and easy card.  My mind doesn't even get to the point of making such yumminess.

Anyway, enough blathering.  Here are my cards.  They all use digis from Di's Digis which can be found here.

This one is my favorite.  The paper is perfect, a lovely blue with snowmen all over it.  I also thought the sentiment worked well.  It is from Fiskar's Season's Greetings.  It is one of the new ones.

This one has a little bling.  I used some of my Martha Stewart Christmas paper.  It is a nice bright red.  I've been in a mood to use that paper this week.

Finally, another version of the Snowman and Penguin hugging.


This sentiment is from Unity Stamps and Jillibean Soup.  You really can't go wrong when you combine those two.   And, did you know Jillibean Soup has started selling digis?  Oh my, I can't wait to play with those.

OK, back to my Advent Calendars. I'm hoping to be able to show a few of them this week.

Wednesday, November 9, 2011

WOYWW - Advent Calendars

Hello Friends -

It is that time of week, the day when crafters around the globe open up their work spaces so you can poke around and see what is going on.


Here is my workstation this morning.  It is in full on creation mode.  The holidays have hit us with a vengeance. If you get a closer look, we have...
this week's cards for the ladies at Humbug Hall.  I'm still trying to get my snowmen turned into actual cards.  One has made it but I haven't found the perfect paper for the other two, yet.

And on this side, we have...
Two advent calendars needing to be put together.  You can see two of the finished ones right behind the front piece of the unfinished one.  I have quite a few of these to get done (I showed one to a lovely lady at the Wonderkid's school and she bought 6 -- yippee!!!).

Here is another picture of the pieces...

and now we have the "auxillary" work space...

I love being able to stand and work on my projects but sometimes there is a ton of glueing or cutting and I want to watch TV and do my project.  That is when this breakfast tray comes out.  I have done so much damage to it, it will never see another piece of food but it works well for sitting on the couch and working.

I'm embarrassed to show a close-up of the items on the tray because you'll also see the disgusting tray but...

Don't you just love the colors on this one?  I've been in a non-traditional colors mood.

Recently, the Scrappy Jedi had a post all about die cutters.  She described her interest in the new Silhouette Cameo as "Cameo fever".  I think that is a great term.  I have a terrible case of Cameo fever, especially when I see these advent calendars and these.  If I could figure out how to get one today, I would be making those cool different calendars, until then, I'll be sticking with my SVGCuts. com calendar with SCAL.

OK, go poke around in everyone else's craft rooms.  I know Julia will have something interesting going on.  I also saw Kath's cubbyhole with all her birthday cards.

Tuesday, November 8, 2011

Halloween - a little late

Hello Friends -

Here are the treats I passed out at Trunk-or-Treat and on Halloween.  The Wonderkid was a Storm Trooper for Halloween so I decided the best way to bag up the candy was with these wonderful Storm Trooper toppers.  They were designed as an party invitation but I thought this worked well.

I found this design already made up by Kristen of Katydid Creativity & Paper.  You can get the SCUT files or SVGs here.  She is kind enough to share them.  Scroll down a little if you are wanting these, they are below a couple of Christmas cards.  Really, this is the correct page.

Here is the inside of the toppers with the candy stapled inside.

I didn't want the staples to show on the front so I only stapled it to the back of the topper.  They seemed to stay closed just fine.  I think they were big enough.

Here is the entire tray of goodie bags.


Here is the car decoration for Trunk-or-Treat.

I made this decoration in no time (as you can probably tell).  I needed something to decorate the car and I really couldn't come up with much.  The entire week before Halloween was a mess for me.  I found these through the Sure Cuts A Lot Forum.  They are from a couple of different fonts/dingbats at Iconian Fonts.

And now with the little Storm Trooper to hand out the candies.  He decided he didn't like the helmet so he ended up going as Luke dressed like a Storm Trooper.


Monday, November 7, 2011

Bugaboos for Crafty Hazelnut's Challenge

Hello Friends -

I have two cards for you today.  They are VERY similar but just slightly different.  Can you find the differences?


and here is the second card.


I must admit, this is going to be a quick post.  Those are all the pictures I have for you today.  As for the details, the images are freebies from Jodi over at Bugaboo Stamps.  One of the things I love about the simpler images, my coloring doesn't need to be as sophisticated.  I'm just not that good at the layering and shading and all that.  

Here is the link for the AKVs.  I'm not certain they are in there (I think these were special for Facebook Friends or newsletter recipients).  Don't forget to tell Jodi how much you like them.

The paper is from a Martha Stewart Christmas pack that I bought last year.  

I am entering these in the Crafty Hazelnut's Christmas Challenge blog (she was looking for something with bright colors) and the Catch the Bug Anything Goes Challenge.


Friday, October 28, 2011

Bah Humbug Die Cuts

Hello Friends -

This is my last week as a guest designer at Bah! Humbug! Challenges.  I am very sad to leave the lovely ladies of the manor but I hope you will join in some of their challenges.  It is a wonderful way to get ready for the holidays without trying to get all of your cards done at the last minute.


Today's challenge is die cuts.  I must admit, this one was tough because the possibilities seemed endless.  I could cut with my cuttlebug.  I could cut with my electronic cutter.  What to do? What to do?

So, I decided to do one of each (I was shooting for two but it just didn't happen).  The first one is an ornament shape card.  I made it using a Lettering Delights simple shape and Sure Cuts a Lot.  I'm disappointed in the way the photo came out.  In person it is all sparkly and fun.


Then I made this simple shaped card using my cuttlebug and a round Spellbinders die.  I think I learned this technique on BBTB2.  To make the base you fold your cardstock in half and then place it in the die just a little bit off.  This way it doesn't cut through the top of the card.  Then I used the next smaller die to cut out the cute Tiddly Inks image.  I can't find him in the Tiddly Inks store right now but I'm certain he is there somewhere.


Finally, I made this side step card.  I used the tutorial at Split Coast Stamper.  I must say, whenever I'm looking for a tutorial on how to make a card, I find they are likely to have it and all of their tutorials have been easy to follow.   I used my electronic cutter to make this card.  All of the images are from Cricut carts, Child's Year, Celebrations and Joy of the Seasons.

I hope you like the die cut cards and a huge thank you to the ladies of the manor.